Ever had a mango that tasted like a crunchy potato? We’ve all been there! In “How To Identify Ripe Fruit By Species And Variety,” we’re diving into the magnificent, sometimes mysterious world of fruit picking. Imagine walking confidently through the produce aisle, mastering the squeeze, sniff, and color test for every fruit type. These species-specific hacks will ensure you never, ever buy unripe or overripe produce again. Using insights that are as refreshing as a ripe peach, we’ll turn your fruit-picking into an art form. Ready to become a pro?
Key Takeaways
- Learn the art of the squeeze – not too firm, not too soft, just like a good handshake.
- Get your sniffing game strong – a ripe fruit smells as sweet as it tastes.
- Spot ripe fruit by color, but also by species – an orange banana is not the goal.
- Avoid the heartbreak of unripe avocados with our simple hacks.
- Never play ‘Is it ripe?’ guessing games in the grocery aisle again!
Why Mastering Fruit Ripeness Matters More Than You Think
You know that frustrating moment when you bite into a beautiful-looking peach at home, only to discover it’s mealy and flavorless? Or worse—you grab what looks like a ripe avocado, slice it open, and find it’s still rock-hard inside? Yeah, we’ve all been there. Learning how to identify ripe fruit by species and variety is honestly one of those life skills that saves you money, reduces food waste, and actually makes your meals taste incredible. The squeeze, sniff, and color test aren’t just fancy produce-aisle tricks—they’re your secret weapons for never settling for mediocre fruit again. Whether you’re shopping at a farmers market, a big-box grocery store, or a specialty fruit vendor, understanding the ripeness indicators specific to each fruit type transforms you from a random fruit picker into someone who actually knows what they’re doing.
- Different fruit species have wildly different ripeness signals—what works for a mango won’t work for a pear, and that’s where most people mess up.
- The squeeze, sniff, and color test is a trifecta approach that works because it combines multiple sensory cues for accuracy.
- Knowing your fruit varieties matters too—a Honeycrisp apple ripens differently than a Granny Smith, and understanding these nuances elevates your shopping game.
- Proper ripeness identification directly impacts flavor, texture, and nutritional value, making it worth the extra 30 seconds per fruit.
- This knowledge extends your produce’s lifespan, helping you buy at the perfect moment for your eating timeline.
The Universal Ripeness Tests: Squeeze, Sniff, and Color
Before we dive into species-specific hacks, let’s talk about the holy trinity of ripeness testing. These three methods—the squeeze, sniff, and color test—form the foundation of how to identify ripe fruit across virtually every variety. Think of them as your produce-picking superpower. The squeeze tells you about firmness and readiness, the sniff reveals aromatic compounds that develop as fruit ripens, and the color shift indicates pigment development and sugar concentration. But here’s the thing—and this is crucial—you’ve got to know how to apply each test correctly for your specific fruit. A gentle squeeze is different for a delicate berry versus a sturdy melon, and a “ripe” color for a banana looks completely different than a ripe color for a strawberry.
- The Squeeze Test: Gentle pressure between your thumb and fingers reveals firmness levels. For stone fruits, you’re looking for a slight give without mushiness. For citrus, you want to feel density and weight without sponginess.
- The Sniff Test: This is where aroma intensity peaks in ripening fruit. Ripe mangoes smell distinctly sweet and fragrant, ripe pineapples develop a honey-like scent at the crown, and ripe peaches emit a perfume-like fragrance. If you can’t smell it, it’s probably not ready.
- The Color Test: Ripeness colors vary dramatically by species. Green bananas become yellow, green avocados develop darker hues, and berries shift from light to deep, saturated colors. But color alone can be deceiving—that’s why you pair it with the other tests.
- The Weight Test (Bonus): A ripe fruit typically feels heavier than it looks because it’s packed with water content and sugars. This matters especially for melons and citrus fruits where density indicates juiciness.
- The Skin Test: Check for blemishes, soft spots, or wrinkles. Minor surface imperfections are fine, but deep bruises or mushy areas suggest overripeness or damage.
Stone Fruits: Peaches, Plums, Nectarines, and Apricots
Stone fruits are where a lot of people struggle because they’re incredibly time-sensitive. You’ve got maybe a 2-3 day window where they’re perfectly ripe, and it’s easy to miss that sweet spot. These fruits don’t continue ripening significantly after you pick them (unlike bananas or avocados), so buying them at the right moment is genuinely important. The good news? Once you know what to look for, identifying ripe stone fruits becomes almost second nature. The key is understanding that ripeness in stone fruits is all about that subtle give and the aroma that develops.
- Peaches: Look for a yellow or golden undertone beneath any red blush. Press gently near the stem end—ripe peaches yield slightly without being mushy. The sniff test is essential here; a ripe peach smells absolutely heavenly. Avoid green-tinged peaches as they’ll never develop proper sweetness.
- Plums: These little guys come in purple, red, or golden varieties depending on the type. A ripe plum should have a slight give when squeezed gently. The skin should be deeply colored without any green undertones. If it smells sweet and fragrant, you’re golden.
- Nectarines: Similar to peaches but with smooth skin instead of fuzzy. Look for a warm, reddish or golden color and that gentle give when squeezed. Don’t buy nectarines that are hard as rocks because they won’t soften up nicely once you get them home.
- Apricots: These are tiny but mighty. A ripe apricot has a warm, golden-orange color and yields slightly to gentle pressure. They should smell sweet and fruity. Apricots are particularly prone to being picked underripe, so the sniff test really matters here.
- Pro Tip for All Stone Fruits: Avoid any with large dark bruises or overly soft mushy spots. Minor cosmetic blemishes are totally fine and don’t affect the interior quality.
Berries: Strawberries, Blueberries, Raspberries, and Blackberries
Berries are trickier than they initially seem because they’re incredibly delicate and don’t ripen much after picking. You’re basically buying berries that are already at or near their peak ripeness, so the ripeness window is narrower than with other fruits. The good news is that identifying ripe berries is pretty straightforward once you know what signals to look for. Color is your primary indicator here, but you’ve also got to consider firmness and, yes, the sniff test plays a role too.
- Strawberries: Look for deep red color throughout—not just on the surface, but extending into the base. The red should be vibrant, not pale or orange. Gently squeeze; ripe strawberries give slightly but aren’t mushy. They should smell sweet and fragrant. Avoid berries with white or pale patches because those areas won’t ripen.
- Blueberries: These should be deep blue with a slight silvery bloom on the surface (that’s natural wax). Ripe blueberries roll freely in your hand without crushing easily. They don’t have a strong smell, but they should taste sweet when you try one (yes, most markets let you sample). Avoid any that are reddish or dull-colored.
- Raspberries and Blackberries: Look for deep, dark, saturated colors. These berries should be plump and firm but not hard. They’re fragile, so be gentle when handling. The sniff test is less reliable here, but they should smell sweet and fruity. Avoid berries that look shriveled or have any mold.
- Container Check: Examine the bottom of berry containers. If there’s visible juice or mold, those berries are past their prime or damaged. You want a dry container with no signs of deterioration.
- Ripeness Reality: Unlike other fruits, berries won’t ripen further once picked. So if you’re buying them today for eating today, you want them fully ripe. If you’re buying them for a few days later, pick ones that are just barely ripe.
Citrus Fruits: Oranges, Lemons, Limes, and Grapefruits
Here’s where a lot of people get confused because citrus fruits don’t really “ripen” the way other fruits do once they’re picked. They stop developing sugars and acids after harvest, so the color you see in the store is basically what you get. But that doesn’t mean all citrus fruits are created equal—there’s definitely a skill to picking the juiciest, sweetest ones. The ripeness of citrus is more about optimal ripeness at the moment of picking, and there are specific indicators for each variety that’ll help you choose the best specimens.
- Oranges: Look for deep orange color and a smooth, thin skin. The weight test is crucial here—a ripe orange should feel heavy for its size, indicating juice content. Gently squeeze; you want to feel firmness without any spongy give. Avoid oranges with soft spots or blemishes. The color should be consistent throughout without green patches.
- Lemons and Limes: Ripe lemons are bright yellow with thin, glossy skin. Ripe limes are deep green (key limes) or yellow-green (Persian limes). Both should feel heavy and dense when you squeeze gently—that weight indicates juice. Avoid wrinkled, dried-looking specimens with thick, bumpy skin.
- Grapefruits: These should be heavy for their size, indicating juice content. Look for thin, smooth skin and an overall round shape. Color varies by variety (pink, red, or white), but it should be consistent and vibrant. Avoid grapefruits with soft spots or overly thick skin.
- The Weight Game: With all citrus fruits, density matters way more than color. Pick up two similar-sized fruits and choose the heavier one—that’s your winner. Lighter fruits often have thick skin with less juice inside.
- Firmness Balance: Citrus should feel firm with slight give. If it feels rock-hard, it might have thick skin. If it feels mushy, it’s deteriorating. That sweet spot in the middle is what you’re hunting for.
Tropical Fruits: Mangoes, Pineapples, Papayas, and Coconuts
Tropical fruits are where things get fun because they’re so flavorful when perfectly ripe, but they can be absolutely disappointing if you get the timing wrong. These fruits often travel long distances to reach your grocery store, and they’re typically picked before full ripeness to survive the journey. This means you’ve got a bit more flexibility with ripeness windows compared to berries or stone fruits. The squeeze, sniff, and color test absolutely apply here, but you need to know the specific signals for each tropical fruit because they vary significantly.
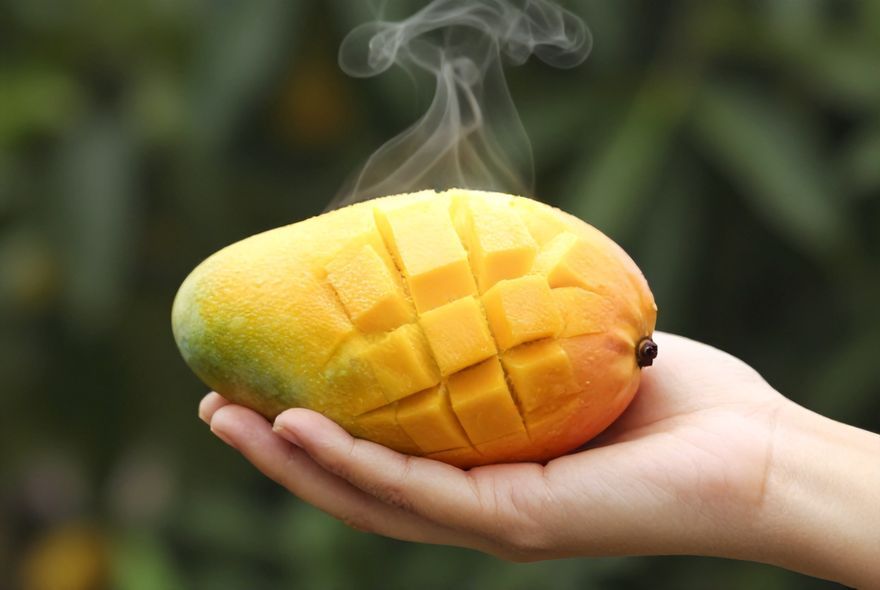
- Mangoes: This is where the sniff test absolutely shines. A ripe mango smells distinctly sweet and fragrant, especially near the stem end. Look for a slight color change from green to golden, red, or orange depending on the variety. Gently squeeze near the narrower end (not the round end)—ripe mangoes yield slightly without being mushy. Avoid hard, green mangoes unless you plan to ripen them at home over several days.
- Pineapples: Look for a golden-yellow color, though some varieties stay greener. The key indicator is the crown leaves—pull gently, and if a leaf comes out easily, it’s ready. Sniff the crown; ripe pineapples smell sweet and tropical. Squeeze the body gently; it should give slightly. Avoid pineapples with soft or dark spots on the body.
- Papayas: Ripe papayas have yellow-orange skin with just a touch of green. They should give slightly to gentle pressure but not be mushy. The sniff test helps—ripe papayas smell sweet and fruity. Press gently near the stem end; if it yields, you’re good. Avoid papaya that’s completely green or very soft.
- Coconuts: This is unique because you’re not looking for traditional ripeness indicators. For drinking coconuts (young green ones), you want them to feel heavy with liquid sloshing inside. For mature coconuts (brown ones), look for brown, fibrous husks without cracks. Shake it; you should hear liquid inside.
- Ripening at Home: Many tropical fruits continue ripening after purchase. If you buy slightly underripe tropical fruits, store them on your counter away from direct sunlight. They’ll develop sweetness and aroma over several days.
Melons: Watermelons, Cantaloupes, and Honeydew
Melons present a unique challenge because they’re big, you usually can’t cut them open to inspect, and there’s nothing worse than getting home with a melon that’s either flavorless or mealy. The good news is that melons have pretty consistent ripeness indicators, and once you learn them, you’ll become a melon-picking pro. The sound test, the weight test, the smell test, and the color test all come into play here, making melons a comprehensive exercise in ripeness identification.
- Watermelons: Look for a creamy yellow or pale green spot on one side (where it rested on the ground)—this indicates it ripened on the vine. The melon should feel heavy for its size. Tap it; a ripe watermelon produces a deep, hollow sound, while an unripe one sounds more dull or tinny. The skin should have a dull finish, not a glossy one. Avoid melon with soft spots or bruises.
- Cantaloupes: Look for a golden-tan color (not pale or greenish) and a netted or bumpy skin pattern. Gently press the stem end; it should yield slightly. Smell the bottom end; ripe cantaloupes have a sweet, musky aroma. The melon should feel heavy and dense. Avoid cantaloupes that smell musty or have soft spots.
- Honeydew: These are trickier because color is less reliable. Look for a creamy yellow or light tan color on the bottom. Smell the end; ripe honeydew has a sweet, floral scent. Press gently; it should give slightly at the stem end. The weight test matters—a ripe honeydew feels heavy and dense. Avoid hard, green honeydew unless you’re planning to ripen it at home.
- The Sound Test: This is especially useful for watermelons. A ripe melon produces a deep, resonant sound when tapped. An underripe melon sounds more tinny or dull. Practice by trying melons and noting the sound difference.
- Size Consideration: Don’t assume bigger means riper. Choose melons that feel appropriately heavy for their size. A melon that’s too light suggests less water content and flavor.
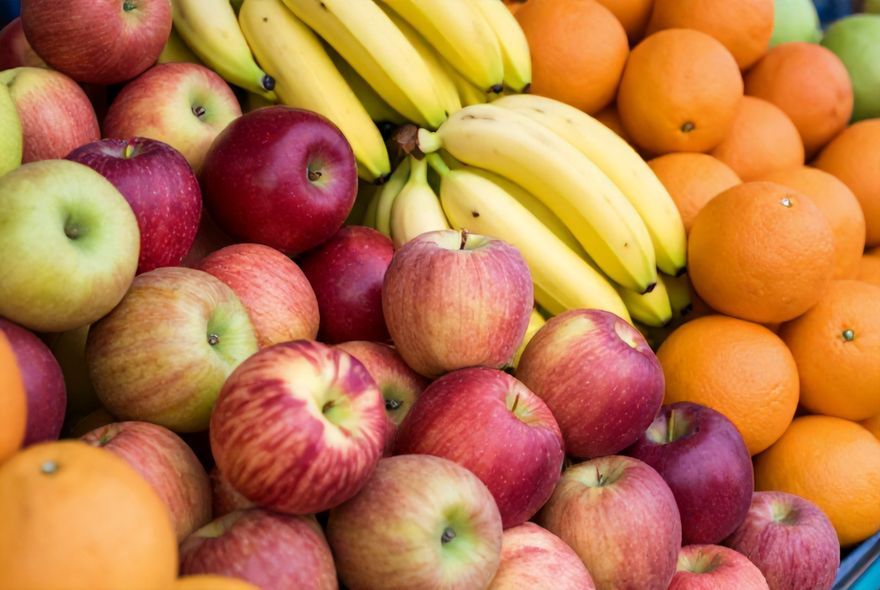
Apples and Pears: Varieties and Ripeness Signals
Apples and pears are interesting because ripeness indicators vary dramatically by variety, and these fruits actually do continue ripening after being picked (especially pears). With apples, you’re generally looking for fruits that are already ripe at purchase since they don’t improve much after picking. With pears, ripeness is a bit more flexible, and you can actually buy slightly underripe pears and let them develop at home. Understanding variety-specific ripeness signals is crucial because a Honeycrisp apple ripens completely differently than a Granny Smith.
- Red Apple Varieties (Gala, Honeycrisp, Fuji): Look for deep, rich red coloring without green patches. These apples should feel firm with a slight give near the bottom. The weight test applies—a ripe apple feels dense and heavy. Sniff the bottom end; ripe apples have a subtle, sweet aroma. Squeeze gently; you want firmness, not mushiness. These varieties are generally sweet, so color is a good indicator.
- Green Apple Varieties (Granny Smith): Don’t wait for color change here because these stay green when ripe. Look for a firm, hard texture and a consistent green color. The weight test is essential—a ripe Granny Smith feels dense and heavy for its size. These apples should have minimal give when squeezed. The flavor is tart, so ripeness is more about firmness and density than anything else.
- Pears (Bartlett, Bosc, Anjou): This is where pear ripeness gets confusing because they ripen from the inside out. A pear can look perfect on the outside but be mushy inside, or look firm but be perfectly ripe internally. Press gently at the narrow end near the stem; a ripe pear yields slightly here while remaining firm elsewhere. Pears continue ripening at home, so buying slightly firm pears is actually smart. They should smell sweet and fragrant when ripe.
- Variety Matters Tremendously: Honeycrisp apples have a crisp, juicy texture when ripe. Fuji apples are dense and sweet. Granny Smiths are crisp and tart. Bosc pears are firm and grainy. Bartlett pears are juicy and soft. Knowing your varieties helps you set proper ripeness expectations.
- Storage Reality: Unlike tropical fruits, apples and pears don’t improve much in flavor after picking. Apples especially should be purchased at or near peak ripeness. Pears are the exception—they benefit from ripening at home over a few days.
Avocados: The Ripeness Sweet Spot
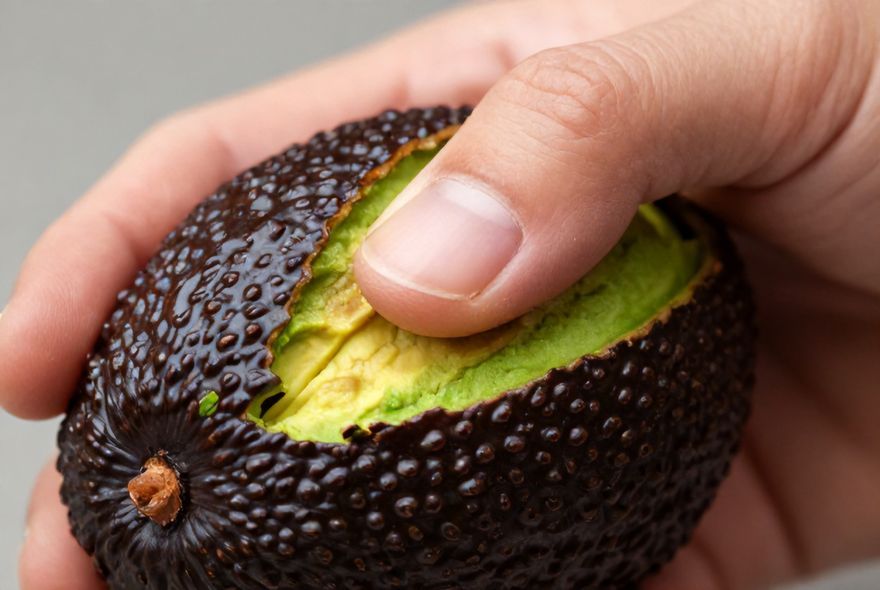
Avocados deserve their own section because they’re simultaneously one of the most popular fruits and one of the most frequently purchased at the wrong ripeness level. Here’s the thing about avocados—the ripeness window is genuinely narrow, but it’s also forgiving in a weird way. You can buy underripe avocados and ripen them at home, or you can buy perfectly ripe ones for immediate use. The key is knowing how to identify where your avocado sits on that ripeness spectrum. The squeeze test is absolutely crucial for avocados, but you’ve got to know exactly how much pressure to apply.
- The Firmness Scale: An underripe avocado is rock-hard and won’t yield to pressure at all. A perfectly ripe avocado yields slightly when squeezed gently in your palm. An overripe avocado mushes easily and may have brown spots inside. You’re hunting for that middle ground where it gives just a bit without being mushy.
- Color Progression: Most avocado varieties (like Hass) shift from bright green when unripe to darker green or black when ripe. But color alone is deceiving—a dark avocado might be overripe inside while looking perfect outside. This is why the squeeze test is non-negotiable for avocados.
- The Pit Test: If you want to be absolutely sure, gently remove the pit (carefully!) and check the flesh. Ripe avocado flesh is pale yellow-green with no dark spots. Dark or brown flesh indicates overripeness. This test only works if you’re buying from a store that lets you do this.
- Ripening at Home: If you buy firm avocados, store them on your counter in a paper bag or at room temperature. They’ll ripen in 1-3 days depending on how underripe they were. You can speed this up by putting them in a paper bag with a banana, which releases ethylene gas that accelerates ripening.
- The Stem End Trick: Pop off the small stem end. If it’s brown and mushy underneath, the avocado is overripe. If it’s green, the avocado is good. This is a sneaky way to check without squeezing, though some stores frown on it.
Bananas: The Ultimate Ripeness Guide
Bananas are wonderfully straightforward compared to many other fruits because the ripeness progression is so visually obvious. The color change from green to yellow to brown tells you almost everything you need to know about ripeness level. But here’s where it gets interesting—what’s “ripe” depends entirely on what you’re going to do with the banana. Are you eating it today? Tomorrow? Using it for baking? Your ripeness choice should align with your immediate plans. Understanding banana ripeness is genuinely important because it affects flavor, texture, and even digestibility.
- Green Bananas: These are underripe and full of resistant starch, which some people find harder to digest. The flavor is starchy and bland. If you buy green bananas, store them on your counter, and they’ll ripen over several days. Green bananas are great if you need them in 2-3 days.
- Yellow Bananas: This is peak ripeness for most people. The banana is yellow with maybe a few brown specks. The flavor is sweet, the texture is creamy, and the starch has converted to sugars. Bananas at this stage are perfect for eating fresh. If a banana is fully yellow with no green at all, it’s ready to eat immediately.
- Yellow with Brown Specks: These bananas are still excellent for eating fresh, and they’re actually sweeter than completely yellow bananas. The brown specks indicate sugar development. This is honestly the sweet spot for most people’s preferences.
- Brown Bananas: When bananas develop significant brown coloring or are almost entirely brown, they’re overripe for fresh eating but perfect for baking. The flesh becomes soft and sweet, ideal for banana bread, smoothies, or frozen banana ice cream. Don’t judge a brown banana by its appearance—it’s delicious in its own way.
- Storage Strategy: Store bananas on your counter if you want them to ripen. To slow ripening, refrigerate them (the peel will darken, but the inside stays fresh longer). Separate bananas from the bunch so they ripen more evenly. If you’re buying for the week, get bananas at different ripeness levels so you have options throughout the week.
Pro Tips for Consistent Produce Success
Now that you understand how to identify ripe fruit by species and variety, let’s talk about some overarching strategies that’ll level up your entire produce game. These are the little hacks and mindset shifts that separate casual fruit buyers from people who consistently bring home amazing produce. It’s not just about knowing the individual ripeness tests—it’s about understanding your timeline, your preferences, and how to work with the natural ripeness progression of different fruits.
- Plan Your Timeline: Think about when you’ll actually eat the fruit. If you’re shopping for a week, buy a mix of ripeness levels. Get some fruit that’s ripe today, some that’ll be ripe in 2-3 days, and some that’ll be ready by the weekend. This strategy means you always have something good to eat.
- Trust Your Senses: Don’t rely solely on color or appearance. Use all your senses—squeeze, sniff, look, and even listen (for melons). Your instincts combined with the ripeness indicators in this guide are incredibly reliable. If something feels off about a fruit, skip it.
- Build Relationships with Vendors: If you shop at farmers markets or specialty produce stores regularly, talk to the vendors. They know their fruit intimately and can point you toward the ripest specimens or tell you when certain varieties will peak. This insider knowledge is invaluable.
- Know Your Storage: Different fruits ripen at different speeds when stored together. Keep bananas separate from other fruits because they release ethylene gas that accelerates ripening in nearby produce. Store berries in the coldest part of your fridge. Keep stone fruits on the counter until ripe, then move to the fridge. Understand these patterns and optimize your storage accordingly.
- Don’t Fear Imperfection: Minor blemishes, odd shapes, and cosmetic imperfections don’t affect taste or quality. Some of the most delicious fruit looks slightly wonky. Stop assuming perfection equals quality and start focusing on ripeness indicators instead.
- Sample When Possible: If you’re at a market or store that allows sampling, absolutely take advantage. One taste tells you more than a thousand ripeness indicators. It’s the ultimate quality check.
Common Ripeness Mistakes and How to Avoid Them
Even with all this knowledge, it’s easy to slip back into old habits or make assumptions that lead to disappointing produce purchases. Let’s talk about the most common mistakes people make when identifying ripe fruit and how to sidestep them. Being aware of these pitfalls is honestly half the battle. Once you know what mistakes to watch out for, you’ll naturally start making better choices at the produce aisle.
- Relying Solely on Color: Color is important, but it’s not the whole story. A beautiful-looking peach can be mealy inside. A deep-red strawberry can be sour. Color tells you part of the ripeness story, but you need to combine it with other sensory tests. The squeeze, sniff, and weight tests provide the complete picture.
- Buying Everything at Peak Ripeness: This is actually a strategy failure, not a ripeness identification issue. If you buy all your fruit at peak ripeness, you’ll have nothing to eat in 2-3 days. Buy a mix of ripeness levels based on your consumption timeline.
- Ignoring the Sniff Test: Aroma is legitimately one of the most reliable ripeness indicators, especially for stone fruits and tropical fruits. If a fruit doesn’t smell fragrant or sweet, it’s probably not ripe. Don’t skip the sniff test just because you’re self-conscious about smelling fruit in public.
- Squeezing Too Hard: You’re testing ripeness, not trying to bruise the fruit. Apply gentle pressure with your thumb and fingers. If you’re squeezing hard enough to leave an indentation, you’re applying too much pressure. Gentleness is key.
- Not Considering Fruit Variety: A Honeycrisp apple and a Granny Smith look completely different and ripen differently. Assuming all apples or all pears follow the same ripeness rules will lead to disappointment. Learn the specific characteristics of the varieties you buy regularly.
- Forgetting About Temperature: Ripening is a temperature-dependent process. Fruit ripens faster on the counter than in the fridge. If you buy underripe fruit and immediately refrigerate it, it won’t ripen properly. Keep underripe fruit at room temperature until it reaches your desired ripeness, then refrigerate to slow further ripening.
You can explore more detailed information about fruit ripeness and selection techniques at our comprehensive guide on fruit identification and ripeness, which covers additional species and advanced selection methods.
So here’s the thing—you’ve now got the knowledge to completely transform your produce shopping experience. You understand the squeeze, sniff, and color test. You know how different fruits signal ripeness. You’ve got species-specific hacks for everything from berries to bananas. Most importantly, you understand that ripeness identification isn’t some mysterious skill reserved for farmers market experts. It’s a learnable, practical ability that makes an immediate difference in your eating experience. Start applying these techniques next time you shop, and notice how the quality of fruit you bring home improves almost immediately. Your taste buds will thank you, your wallet will appreciate the reduced waste, and you’ll never settle for mediocre produce again.
Embarking on the quest to master the squeeze, sniff, and color test isn’t just about avoiding unripe or overripe produce—it’s about enhancing your grocery shopping experience with species-specific hacks. From apples to avocados, knowing the optimal time to indulge keeps your fruit fresh, flavorful, and fiendishly delicious. We’ve peeled back the secrets across different varieties, so you won’t just pick the perfect piece of fruit—you’ll know exactly why it’s perfect. This isn’t just about your taste buds—it’s about making informed choices that elevate your diet into a healthy new realm.
Feeling fruity yet? If you haven’t already, it’s time to put these ripeness hacks to the test! Follow us on Facebook for more juicy tips, like our profiles on Instagram for vibrant visuals, and check us out on Twitter to stay updated with our latest revelations. Your fruit bowl won’t know what hit it—and neither will your taste buds. Dive into the produce section like never before and let the fun be fruity!


Leave a Reply