
Ever tried taking apart a carburetor and ended up with bolts, springs, and a mysterious extra piece scattered around? Don’t worry, you’re not alone! “How To Clean A Carburetor Without Taking It Apart” dives into the lazy person’s dream of keeping engines purring sans disassembly nightmare. Imagine saving hours and sidestepping frustration — sounds too good to be true? Well, it’s not. This blog covers the nifty, insider tricks you need, according to top engine whisperers. Let’s dive into this stress-free guide, perfect for anyone dreading the usual carb cleaning chaos.
Key Takeaways
- Want to skip the disassembly nightmare? Check out our effortless method for cleaning a carburetor without taking it apart.
- Keeping your engine purring like a kitten doesn’t have to be frustrating—discover our easy carburetor cleaning hack.
- No tools required! Clean your carburetor in no time with our lazy person’s guide.
- Save hours and avoid headaches with this straightforward carburetor cleaning technique.
- Who needs a toolbox when you’ve got these simple steps to maintain your engine’s performance?
- Get your engine running smooth without the fear of disassembly—find out how!
Why Your Carburetor Gets Gunked Up (And Why You Don’t Need to Panic)
So, your engine’s been coughing like it’s got a cold, and you’re pretty sure the culprit is your carburetor. Here’s the thing—you’re probably right. But before you start taking apart every bolt and gasket on that thing, let me stop you right there. The lazy person’s guide to carburetor cleaning doesn’t require you to disassemble anything, and honestly? It might just save your weekend. Your carburetor gets gunked up over time because fuel sits in there, especially during off-seasons, and it leaves behind varnish and deposits that clog everything up. The good news is that you can fix this without turning yourself into a frustrated mechanic.
- Fuel naturally oxidizes when it sits idle, creating sticky residue that builds up inside your carburetor.
- Old or low-quality fuel accelerates varnish formation—think of it as engine sludge’s annoying cousin.
- Seasonal storage without proper fuel treatment is basically asking for trouble down the road.
- Temperature changes cause moisture to condense inside the carburetor, mixing with fuel and creating a gunk cocktail nobody wants.
- A clogged carburetor makes your engine run rough, sputter, or refuse to start altogether—your engine’s way of saying “help me.”
The Magic of Carburetor Cleaner: Your New Best Friend
You know that moment when you discover a product that actually does what it promises? That’s carburetor cleaner. This stuff is specifically formulated to dissolve varnish, gunk, and deposits without you having to take your carburetor apart. It’s like having a tiny cleaning crew that works while you’re sipping coffee. When you clean a carburetor without taking it apart, carburetor cleaner is doing the heavy lifting. The solvent penetrates all those tight spaces where buildup hides, breaking down deposits and flushing them out through the fuel system. It’s efficient, it’s fast, and it doesn’t require a degree in small engine repair.
- Carburetor cleaner dissolves varnish and fuel residue in minutes—the chemical formulation targets exactly what’s clogging your engine.
- Spray applications reach internal passages that hand-cleaning can’t touch, ensuring comprehensive cleaning without disassembly.
- Most formulas evaporate quickly, leaving no residue behind to cause new problems.
- It’s affordable—a can costs less than what you’d spend on coffee this week.
- Use it as a preventative measure, and you’ll avoid major headaches (and repairs) down the line.
Fuel Additives: The Preventative Approach That Actually Works
Here’s where the lazy person’s guide to carburetor cleaning gets really interesting. What if I told you that you could prevent most gunk buildup before it even starts? Fuel additives are like vitamins for your engine—they keep things running smoothly without requiring any extra work from you. When you add fuel system cleaner to your gas tank, it travels through your carburetor with the fuel, dissolving deposits and keeping everything clean. It’s preventative maintenance that feels like you’re not even doing maintenance. I’ve seen engines that never got clogged simply because their owners used a quality fuel additive every couple of fill-ups. That’s not magic; that’s just smart thinking.
- Fuel additives contain detergents that dissolve varnish buildup throughout your entire fuel system—carburetor included.
- Regular use prevents the formation of sticky deposits, meaning you’ll clean your carburetor without taking it apart because it won’t get that dirty in the first place.
- Quality additives stabilize fuel during storage, reducing oxidation that happens when equipment sits unused.
- They’re compatible with all fuel types and engine sizes—just dump them in your tank and drive normally.
- Cost-wise, preventative additives beat expensive repairs and replacement parts by a landslide.
The Step-by-Step Process: Cleaning Without Touching a Wrench
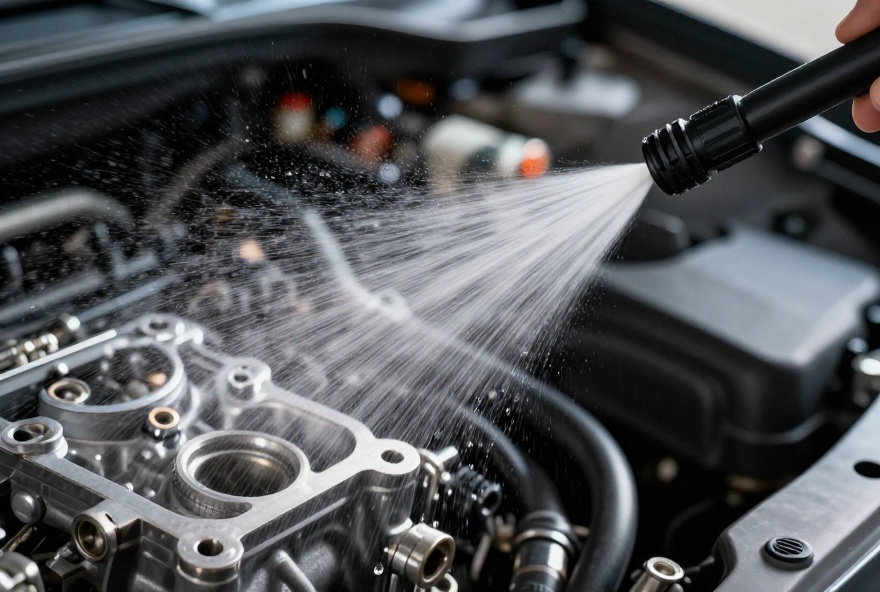
Alright, let’s get practical. Cleaning your carburetor without taking it apart is straightforward, and I’m going to walk you through it like we’re hanging out in the garage together. First things first—safety. Make sure your engine is cold because hot metal and carburetor cleaner don’t mix well. Park your vehicle or equipment somewhere well-ventilated because these chemicals smell strong and need air circulation. You’ll want to gather your supplies before you start: carburetor cleaner, a spray nozzle attachment if your can doesn’t have one, and some old rags or shop towels. Then, locate your carburetor (usually sits on top of the engine, looks like a metal cylinder with stuff attached to it) and get ready to give it some attention.
- Start with a cold engine—never spray carburetor cleaner on a hot engine; it’s dangerous and ineffective.
- Locate the carburetor’s external surfaces and spray them down with cleaner, using the small straw attachment to reach tight spots and crevices.
- Pay special attention to the idle adjustment screw area and the fuel inlet—these are trouble zones where deposits love to hide.
- Let the cleaner sit for a few minutes, allowing it to penetrate and dissolve buildup before you wipe it away with a clean rag.
- Repeat the spray-and-wipe process 2-3 times until you’re confident the external surfaces are clean and the drips running off are clear instead of brown.
Going Deeper: Accessing Internal Passages Without Disassembly
Here’s where you’re probably wondering—”But what about the inside?” Good question. The inside is exactly why you don’t need to take your carburetor apart. You can access internal passages through the fuel line connection and the overflow tubes. It’s not as intimidating as it sounds, I promise. When you spray carburetor cleaner through these entry points, it travels through all the internal passages, dissolving deposits as it goes. This is the lazy person’s secret weapon because it cleans everything that matters without requiring you to understand the intricate internal geometry of your carburetor. The fuel inlet is your main access point, and a few strategic sprays here will work wonders for your engine’s performance.
- Spray carburetor cleaner directly into the fuel line inlet—this allows the solvent to flow through internal passages and dissolve buildup from the inside out.
- Use the thin straw attachment to direct cleaner into overflow tubes and any visible openings—precision here prevents overspray.
- Let gravity help you by spraying and allowing the cleaner to drip through, carrying dissolved deposits down and out.
- Repeat this internal cleaning process several times, checking that drips are running clear rather than cloudy or discolored.
- Some people prefer removing the fuel line temporarily to have better access—totally optional, but it makes the job even easier.
Dealing with Stubborn Deposits: When Spray Isn’t Enough
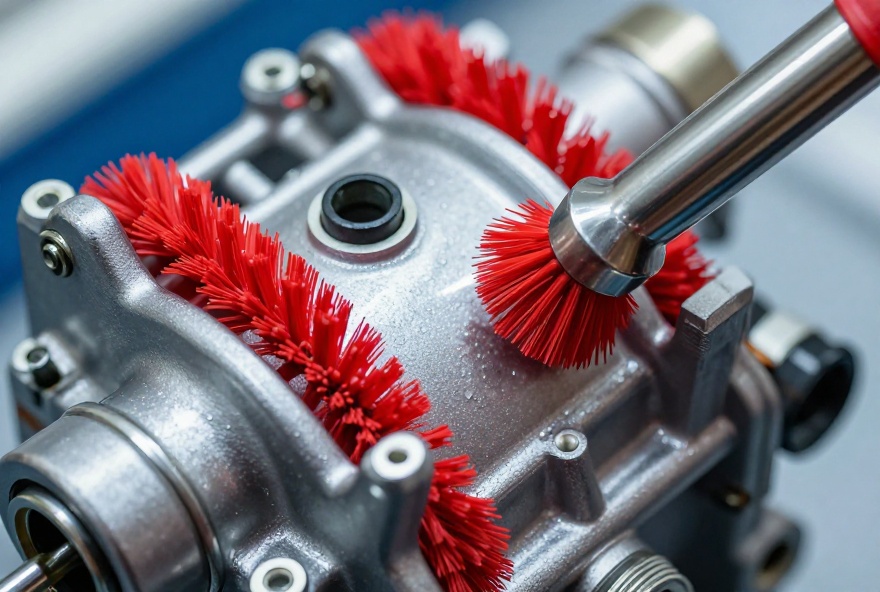
Sometimes, you’ll encounter a carburetor that’s seen some serious neglect. Maybe it’s been sitting for years, or it’s been running on questionable fuel—either way, stubborn deposits laugh at a single pass of cleaner. Don’t worry. You’ve still got options that don’t involve taking the carburetor apart. The trick is patience and persistence. Soak the carburetor in cleaner for extended periods by wrapping the outside with rags soaked in carburetor cleaner and letting them sit. You can also use a soft brush—not wire, because that scratches internal passages—to gently work away deposits while you’re spraying. It’s slow, it’s methodical, but it works without requiring disassembly.
- Soak stubborn areas by wrapping carburetor cleaner-soaked rags around affected sections and letting them sit for 15-30 minutes.
- Use a soft brass brush to gently scrub external deposits while simultaneously spraying cleaner—the combination is surprisingly effective.
- For really stubborn internal buildup, consider running a fuel system cleaner through your tank and letting it work overnight before starting the engine.
- Sometimes multiple cleaning sessions over several days work better than one aggressive session—think of it as giving deposits time to loosen gradually.
- If deposits are truly extreme, you might need to combine external cleaning with a carburetor soak in a bucket of cleaner (if you can access it easily without full disassembly).
The Rebuild Kit Alternative: When Cleaning Alone Isn’t the Answer
Let’s be honest—sometimes a lazy person’s guide to carburetor cleaning needs to acknowledge its limits. If your carburetor is leaking, has internal cracks, or the gaskets are completely shot, no amount of cleaner will fix it. But here’s the good news: you might not need to take apart your entire carburetor to replace gaskets. Some engines have external gasket access points, and certain rebuild kits are designed for minimal-disassembly situations. You can replace worn gaskets without fully disassembling the unit, which keeps you in the “lazy but effective” zone. It’s a middle ground between just cleaning and going full rebuild, and it addresses problems that cleaning alone can’t solve.
- Identify leaks and worn gaskets—if you see fuel dripping from gasket seams, cleaning won’t fix the problem permanently.
- Minimal-disassembly gasket kits exist for many carburetor models, allowing you to replace worn seals without full reconstruction.
- Replacement gaskets are cheap insurance against future leaks—spending twenty bucks now beats a flooded engine later.
- Check your specific engine model to see if external gasket replacement is possible before committing to major disassembly.
- Sometimes the “lazy” move is recognizing when you need professional help or a rebuild kit rather than struggling through a full disassembly.
Preventative Maintenance: Never Cleaning Your Carburetor Again (Almost)
The ultimate lazy person’s approach? Never let your carburetor get dirty in the first place. This is the real secret sauce. Simple habits—like using quality fuel, adding fuel stabilizer during off-season storage, and running your engine regularly—can keep your carburetor clean for years. When you clean a carburetor without taking it apart once, you’ll want to avoid having to do it again. Prevention is way easier than cure, and it means you’ll spend more time enjoying your equipment and less time troubleshooting. Think of it like brushing your teeth instead of waiting for a root canal—the math is simple, and the results speak for themselves.
- Use quality fuel from reputable stations—it has better additives and leaves fewer deposits than bargain-basement gas.
- Add fuel stabilizer before storing equipment for winter or extended periods—this prevents varnish formation that causes future cleaning headaches.
- Run your engine regularly, even if just for a few minutes—regular operation keeps fuel moving and prevents the stagnation that creates buildup.
- Change your fuel filter regularly; a clean filter prevents debris from reaching your carburetor in the first place.
- Use fuel system cleaner every few fill-ups as preventative maintenance—it’s cheaper than the hassle of dealing with a clogged carburetor later.
Troubleshooting: How to Know If Your Cleaning Worked
So you’ve cleaned your carburetor without taking it apart, and now you’re wondering—did it actually work? Here’s how to tell. Start your engine and listen. A properly cleaned carburetor should allow your engine to start easier, run smoother, and idle more consistently. If you were experiencing sputtering, hesitation, or rough idle before cleaning, those symptoms should improve noticeably. You might also notice better fuel economy because your engine isn’t working overtime to compensate for a clogged carburetor. Give it a few minutes to warm up and run at different throttle levels. If everything sounds like your engine is purring again, you’ve nailed it. If problems persist, you might need a second cleaning round or to investigate other potential issues.
- Listen for smooth idle—a cleaned carburetor should allow your engine to sit at a steady RPM without hunting or surging.
- Test throttle response—acceleration should be crisp and immediate, not sluggish or delayed.
- Check for starting ease—if your engine fires right up instead of cranking reluctantly, cleaning worked.
- Observe running smoothness over several minutes—any remaining sputtering or hesitation suggests you might need another cleaning session.
- Monitor fuel economy; a properly functioning carburetor means your engine runs efficiently instead of dumping extra fuel to compensate for poor atomization.
So, you’ve delved into the art of cleaning a carburetor without the dreaded disassembly. We explored how modern fuel additives can be your best pal, dissolving gunk effectively by simply adding them to your fuel tank. Then, there’s the sneaky trick of using an aerosol spray designed for carburetor cleaning, allowing you to target and blast away the pesky residues without taking anything apart. Remember to run your engine while spraying because that’s when the magic happens—keeping your engine purring without you breaking a sweat. This nifty approach saves tons of time, eliminates frustration, and suits the lazy mechanic in all of us.
Let’s wrap things up, shall we? Ready to embrace the lazy person’s guide and keep your engine as smooth as a cat’s whiskers? No more breakdown dramas! Share your carb-cleaning triumphs or commiserate about past disasters over on Facebook, Instagram, or check out our other guides to make your life a tad easier. Your engine and I both promise—it’s worth it!


Leave a Reply